Wednesday, July 28, 2010

Jamming

DSC_8140


Hi!  I promise I haven’t forgotten you – I just don’t have an inborn need to write.  This makes me a mediocre blogger, at best.  I was never good at keeping a diary or journal, either, even though I really wanted to be.  I don’t process events by writing about them, and I’m not all that great at staying in touch via email or other written means.


Anyway, all that to say – sorry for the infrequent posting, and I think I’ll be changing the format of this blog.  I think I’m going to just post the recipe (which may just be a link to the place where I got it), some photos, and my notes on the recipe – what I’d change, what was really great, etc.  Instead of feeling the need to WRITE about it, this will be more of a record of what I’ve made and how I liked it.  I realize this will probably be not all that exciting to read, but it means I will probably post more often!
 

And now, on to the jam.  I made and froze some strawberry jam last month, but I didn’t really want to deal with the whole canning thing – it just seemed like a hassle.  Then I happened to read a lot more about canning (it’s the season, I think), and I changed my tune!  This jam is yummy – not the best strawberry jam I’ve ever had, but good.  I wasn’t as focused on the actual jam as much as the process of canning.  Now that I’ve tried it, I can pay more attention to what’s going in the jars! 


Beginner Strawberry Jam

4.5 cups crushed strawberries (a 1/2 flat, minus about a pint of yucky berries)
2.5 cups sugar
1 box No Sugar Needed Sure-Jell (in the pink box)


  1. Top and halve the berries.  Crush them, about a cup at a time, with a potato masher.  Put them in a stockpot.
  2. Get all your canning stuff set up and ready to go!
  3. Mix 1/4 cup sugar and the box of Sure-Jell.  Add this mixture to the strawberries.
  4. Bring the berry mixture to a boil over medium-high heat.  Add the rest of the sugar and return to a boil.  Boil for one minute, stirring constantly. Skim foam off top and discard (or save to put on your toast in the morning!  Yum.)
  5. Pour into waiting jars, and process using the boiling-water canning method.
  6. Ta-da!  Strawberry jam, in happy little jars.


DSC_8138

Tuesday, April 20, 2010

Brannon & Niusha's Red Velvet Wedding Cake, Part II


So, here are the details of the wedding cake, in case you want to make one yourself.  This, obviously, is quite a project - I baked a little on Thursday, a little on Friday, and the rest on Saturday.  I got the cakes filled on Saturday, and frosted and decorated them on Sunday - and I still ran late.

I made a 6" tier, an 8" tier, and two 10" tiers (the second 10" tier was kept back in the kitchen and wasn't stacked with the others).  Each tier had 3 layers.  By my math, this should have gotten us about 115 servings, but the chef at the wedding cut them smaller than I'd estimated, and there was a LOT left over (but the pieces he served were plenty big!)

Each 6" tier had a little more than 2 cups of batter in it; each 8" tier had about 3.5 cups of batter in it, and each 10" tier had about 4.5 cups of batter in it.  Each batch of the cake makes about 9 cups of batter, so you'll have a little bit left over.

TO MAKE:
  • 5 batches of  the red velvet cake from Smitten Kitchen
  • 1 batch of caramel sauce. I made my own - recipe below - but good-quality store bought will do (just not ice cream topping!)
  • 1 large batch of cream cheese frosting (recipe below)
  • 2 batches of Dark Chocolate Frosting from Martha Stewart (this is my new favorite chocolate frosting - it is excellent.  It tastes amazing and it spreads divinely!)


Caramel Sauce

2 cups granulated sugar
1 cup water
2 Tbsp light corn syrup
2 cups heavy cream
2 tsp vanilla (optional)

Combine sugar, water, and corn syrup in a large saucepan (better too big than too small!) over high heat. Bring to a boil, stirring to dissolve sugar.  Keep boiling until it turn a lovely brown caramel color (but be careful - it goes from "lovely" to "burnt and bitter" in a blink of an eye), swirling occasionally to avoid hot spots.  When it's the color you want, remove it from the heat and pour in the cold cream, at arm's length.  It will bubble up violently, so be careful!  Stir the cream in, then add the vanilla.  If it's not quite as dark as you want it, you can return it to the heat, stirring the whole time.


Cream cheese frosting

3 8oz pkgs cream cheese, room temperature
3 sticks butter, room temperature
3-4 lbs confectioner's sugar
2 tsp vanilla
water/milk
pinch salt

In the bowl of a standing mixer fitted with the paddle, combine the cream cheese and the butter.  Add the vanilla and the salt and stir until well mixed.  Add the sugar in batches, so it doesn't poof up all over your kitchen.  If the frosting gets too stiff, add a splash of milk or water.  Keep adjusting with sugar and milk until it tastes right and is the consistency you want.  (Keep in mind - you'll be adding caramel sauce to half of it, so you don't want it too loose.)

Divide cream cheese frosting in half, and add caramel sauce (to taste - I added about a cup) to one half.


TOOLS/HARDWARE

  • Cake plates: Wilton Decorator Preferred square plates.  I used the hidden pillars (which are also on that page) to support the cake.
  • Edible pearls: 8mm gold pearlized from Sugarcraft.
  • I covered the big pearls in gold luster dust, also from Sugarcraft.  Just put a teaspoon or so of the dust in a zip-top bag, add the pearls, and give it a good shake.
  • I got the little pearls at Williams-Sonoma in... January?  But I can't find them on the website now.  This is what the bottle looks like:
They're tiny, like 2mm.  You can get a similar product from Sugarcraft, I think.
  • You'll need tweezers to put them on the cake, unless you really want to go insane.
  • You'll also need the typical frosting tools: offset (or not) spatulas, cake boards (always buy more than you think you'll need), and a turntable.


FILLING, FROSTING, AND DECORATING
  • Bake all the cakes.  Once they're cool, wrap them in plastic and keep them in the fridge.  You can do this a couple weeks in advance and freeze them, but I don't have that kind of room in my freezer.
  • Make the filling and fill your cakes.  I filled them all and put them in the fridge overnight.  My tiers, from the bottom up, went like this: cake, caramel cream cheese frosting, cake, cream cheese frosting, cake.
  • Make the frosting and frost the cakes.  Squares can be tricky to frost, but at least you're working with nice spreadable frosting!  Put a generous layer of frosting on each tier - if the frosting is too thin, your pearls will fall off (like mine did).  
  • For the pearls... let's see.  You want the frosting to be room temperature when you put the pearls on, so if you frost them the day of the wedding, like I did, don't refrigerate the cakes after you frost them.  I used long, angled tweezers that I got from Sugarcraft, and I dipped each pearl in a little frosting right before I put them on.

STACKING THE CAKE
  • Stacking the whole cake is easy - I know it's scary if you've never done it before, but I promise it's not too bad!  
  • Starting with the largest tier: use the separator plate for the next smallest tier and center it over your cake.  Once you're sure you like its placement, push the plate gently into the top of your large tier.  The feet will mark where the pillars should go.  
  • If you want space between each tier (say, for flowers), just push the Hidden Pillars directly into the cake, where the marks are.  IMPORTANT: make sure the pillars are vertical!  You don't want them to go into the cake at an angle.
  • If you want the tiers right on top of each other, push one pillar into the cake and mark its height.  Pull it out and use a little saw or knife to cut each pillar to that height.  (IMPORTANT: don't just cut all the pillars for the entire cake to the height of one tier - customize for each tier!  A half-inch makes a difference here.)  Once the pillars are cut, push them into the cake where the marks are.
  • Do this whole process for each tier.
  • Once all the pillars are in the cakes, you can stack them.  Start at the bottom and fit the feet of the plates into the pillars, making sure they're secure.  NOTE: I do not stack cakes before delivery!  I don't need that kind of stress.  I get them all prepped and load them into boxes, then do the final stack at the reception site.

And look - you have yourself a wedding cake!

    Saturday, April 17, 2010

    Hey, Remember that Sock?


    Well, I picked up the sock that I started almost a year ago, and I'm actually making progress on it!  That picture is of the turned heel.  I'm starting on the gusset, and I might have that lone sock finished within a couple of weeks!

    Then I just have to do it all over again...

    Monday, March 22, 2010

    Brannon & Niusha's Red Velvet Wedding Cake, Part 1


    Persians really know how to party - let me tell you!

    This wedding was so much fun to attend.  First, it was nice to have the wedding cake done!  Second, the wedding and reception were at the same venue where my husband and I had our reception more than eight years ago - it was great to go back as guests, when we could focus on the space and the food and really enjoy both!  Third, when Persians celebrate, especially something as joyous as a wedding, they really go all out.  There was lots of dancing, a ton of food, and all sorts of traditions that were new to me.  It was a neat entree into a culture that is not my own.


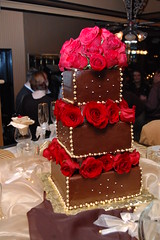
    What you see in the background of the above picture is the sofreh aghd, the traditional ceremonial Persian wedding feast.  It's a central element in the Persian wedding service.  From the wedding program:

    Its various items symbolize what the couple will share in their new life. A few of the significant elements of the sofreh aghd:

    Bread and money signify prosperity and wealth.
    Flowers express the wish for beauty in the couple’s life.
    Sweetness in life, meaning happiness, is represented by honey and pastries, and by the cones of crystallized sugar.
    The nuts and eggs represent fertility.
    Evil spirits, and the evil eye generally, are warded off by the spice tray.
    Rose water brings purity with its perfume.
    And the mirror symbolizes light and clarity, specifically the bright future ahead.


    This wedding ceremony was a mix of Christian and Persian elements - there were two officiants - as the bride is Persian and Episcopalian (the groom is non-Persian and non-religious).


    As for the cake - it was a production!  It was red velvet cake with two types of filling: one regular cream cheese frosting and one caramel-cream cheese frosting.  Each tier had three layers of cake, and the whole thing was covered in dark chocolate frosting.  I think the word we're looking for here is "decadent."

    Now, I'm not really a big fan of red velvet cake.  Sure, it's tender, but it's usually a neither-here-nor-there cake in terms of chocolate.  The groom and I settled on this recipe, though, and thought it looked pretty good (and I was heartened to see that Deb feels the same way about red velvet cake - and liked this recipe anyway!).  I made a sample cake to try everything out, and it's a really good red velvet cake!  You can actually taste the chocolate, which was refreshing.

    The wedding colors were deep red, gold, and brown, so they didn't want it frosted in the white cream cheese frosting that usually adorns red velvet cake.  So I suggested we use the cream cheese frosting as filling between the layers.  In a previous iteration of this wedding cake (with a different cake flavor), the plan had been to use a salted caramel filling, but that would not have played well with the red velvet.  The color of the caramel was appealing, though, so I made my caramel-cream cheese frosting for the couple's sample cake - it was a hit!  The caramel brought out the tang of the cream cheese, and it added just a little more decadence to the cake.


    The frosting is my new favorite chocolate frosting.  It is SO GOOD.  It has obscene amounts of chocolate and butter in it, but it spreads so beautifully and is so richly chocolate that it is worth it.

    The decorations caused me some problems - I love the way they looked, but they took more time to apply than they should have.  Part of the problem is that I didn't discover that I could buy the big gold pearls (instead of trying to make my own similar decoration) until after I'd made the sample cake, so I hadn't actually worked with them before.  A lot of them did not want to stick on the cake.  I know exactly what to do to remedy this problem next time (put the chocolate frosting on thicker, so the pearls can sink in more), but it made for a frustrating day!  And - this really bummed me out - I missed the ceremony because re-applying so many pearls took so long.  But I got the cake there on time, which was the important thing!


    It all worked out in the end, and everyone loved it!  I got lots of compliments on the cake - both its appearance and flavor - and people seemed to like that it was covered in chocolate instead of the usual white buttercream.


    I have to say, after this wedding I'm tempted to only do wedding cakes for Sunday-evening weddings!  It was nice to not have to take time off work to make the cake.  Also, I'm going to call the chef of the Lake Union Cafe (where the wedding was held) the next time I make a wedding cake - he got so many more servings out of this cake than I had planned! 


    Recipes, supplies, etc. to come shortly in a second post.

    Monday, March 1, 2010

    Sneak Preview...


    This is the cake for my friends' wedding, which was last night. More to come, once my kitchen is less disastrous!

      © Free Blogger Templates Spain by Ourblogtemplates.com 2008

    Back to TOP