Tuesday, July 5, 2011

Strawberry Hand Pies

DSC_1296

Today is my husband’s birthday (happy birthday, honey!), and he is a pie guy. He’d much rather have pie than cake, most of the time.  Conveniently, it’s also Pie Party day!

I love making small pies, especially strawberry – I love the flavor of the cooked, jammy strawberries, I love that everyone gets more crust, and I love that I don’t have to try to get the slices to hold together!

We just got back from camp yesterday, and I was running short on time and energy (camp is SO fun and SO exhausting), so I used store-bought crusts.  I used one Pillsbury and one from Grand Central Bakery here in Seattle, and the Grand Central ones held up MUCH better than the Pillsbury ones – I know which I’ll keep in my freezer from now on!


DSC_1284


I got this fun little mini-pie maker a couple of months ago.  It’s supposed to make the pies round, with the filling area star-shaped, but the star shaping gets lost in the baking process.  I don’t really care – it’s still pretty fun and easy to use.  It has a cookie-cutter side to cut the dough, and is hinged to press the crust pieces together with the filling inside.


DSC_1292


Strawberry Hand Pies
from Martha Stewart
Makes 8-10 pies

Ingredients:

  • roughly 3 cups strawberries, hulled and halved or quartered, depending on the size of the strawberry
  • 4 Tbsp sugar
  • 2 Tbsp corn starch
  • Pre-made pie crusts for 2 double-crust pies (4 rounds of store-bought crust)
  • 1 egg
  • water
  • sanding sugar (optional; can also use granulated sugar)
Instructions:
  1. Preheat the oven to 425°.  Line 2 cookie sheets with parchment paper or a silpat.
  2. Stir together the strawberries, sugar, and corn starch in a medium bowl.  Let sit while you prepare the crusts.
  3. Cut an even number of 5-inch rounds from the crusts.
  4. Put about 2 Tablespoons of filling in the middle of half of the rounds.
  5. Brush the edges of the filled rounds with egg wash.
  6. Top each filled round with another unfilled round.  Press and crimp the edges to seal.  Place the pies on the prepared cookie sheets.
  7. Cut a vent in each round.
  8. Brush each pie with more egg wash, and sprinkle with the sanding sugar.
  9. Bake for 20-25 minutes, until golden brown.
  10. Keeps in sealed container at room temperature for up to 2 days.

Monday, June 6, 2011

Oatmeal Scones

DSC_0984

I don’t know if I’ve mentioned it here before, but I’m not really a scone fan.  Even if they have good flavor, they tend to be dry and crumbly and just… disappointing.  I figured this was how scones were supposed to be, and that they just weren’t my thing. So I’d pretty much given up on them until I tried these.  My friend Rebecca made them for a baby shower and – knowing that she makes good food – I tried one.  Well!  They were anything BUT disappointing, and I smuggled one home in my purse.

Turns out I’d had the recipe for YEARS, as it’s in a 2003 issue of Cook’s Illustrated!  I made them a couple of weeks ago, and they’re easy and really good.   Not dry and crumbly!  I don’t think they need anything on them and will happily eat them plain, but my husband and son liked them with jam or honey.  I was hoping these would be healthy enough to make a batch a week and have one for breakfast every morning, but… I plugged the ingredients into an online nutritional calculator, and let’s just say that health food they are NOT. Despite the oatmeal.  Alas.

Make them anyway, though!  Just not for every day.  They keep well, too, if you don’t eat them all the day they’re made.

Oatmeal Scones
from Cook’s Illustrated, Sept/Oct 2003
Makes 8 scones

  • If you use King Arthur flour (or another higher-protein brand of flour), ad an additional 1-2 Tbsp milk.
  • You can substitute half-and-half for the milk/cream mixture (I did).
Ingredients
1 1/2 cups (4.5 oz) old-fashioned rolled oats or quick oats
1/4 cup whole milk
1/4 cup heavy cream
1 large egg
1 1/2 cups (7.5 oz) unbleached all-purpose flour
1/3 cup (2.25 oz) sugar, plus 1 Tbsp for sprinkling
2 tsp baking powder
1/2 tsp salt
10 Tbsp cold unsalted butter, cut into 1/2-inch cubes

  1. Preheat oven (with rack in middle position) to 375°.  Spread oats evenly on a baking sheet and toast in oven until fragrant and lightly browned, 7-9 minutes (it took me more like 10-11 minutes).  Cool on wire rack.  Increase oven temperature to 450°.  Line second baking sheet with parchment paper.  When oats are cooled, measure out 2 Tbsp and set aside.
  2. Whisk milk, cream, and egg in a large measuring cup until incorporated.  Remove 1 Tbsp to a small bowl and reserve for glazing.
  3. Pulse flour, 1/3 cup sugar, baking powder, and salt in a food processor until combined, about 4 1-second pulses.  Scatter cold butter evenly over dry ingredients and pulse until mixture resembles coarse cornmeal, 12-14 1-second pulses.  Transfer mixture to medium bowl; stir in cooled oats.  Using rubber spatula, fold in liquid ingredients until large clumps form.  Mix dough by hand in bowl until dough forms cohesive mass.
  4. Dust work surface with half of reserved oats.  Turn dough out onto work surface and dust top with remaining oats.  Gently pat into 7-inch circle about 1 inch thick.  Using bench scraper or chef’s knife, cut dough into 8 wedges and set on parchment-lined baking sheet, spacing pieces about 2 inches apart.  Brush surfaces with reserved egg mixture and sprinkle with 1 Tbsp sugar (you can use sanding or decorator’s sugar here, if you have it).  Bake until golden brown, 12-14 minutes.  Cool scones on baking sheet on wire rack for 5 minutes, then move scones to cooling rack and cool to room temperature, about 30 minutes (or, y’know, don’t.  They were wonderful warm!).

Wednesday, May 18, 2011

Chocolate-Cinnamon Challah

4667591730_e3d985a906_o

On Saturday, I had the fun of participating in the Food Blogger Bake Sale.  Food bloggers all over the country were putting on bake sales, benefiting Share Our Strength – a great organization whose goal is ending childhood hunger.

It was a TON of fun – I got to meet so many local food bloggers!  We were at the Uptown Metropolitan Market and lots of people came and bought our wares.  We had all sorts of goodies – cake pops, cookies galore, homemade marshmallows, cashew bacon brittle (really good), whoopie pies, cobbler, cake in jars (!) (courtesy of the lovely and crafty Megan of Not Martha), brownies – lots and lots of yum.

My contribution was my chocolate-cinnamon challah, something I’ve been playing with for a year or so now.  It’s basically poor-man’s babka, which is where I got the idea.  I didn’t take any home with me, so I think it was a hit!

NB: “Challah” doesn’t start with the usual “ch” sound – it’s closer to “HA-la.”  If you can do that back-of-the-throat sound like at the end of “Bach,” so much the better!

NB2: The basic challah freezes beautifully and makes FANTASTIC French toast and bread pudding.  Can’t be beat.


4667592198_506d0fe5fe_b


Basic Challah Recipe
Adapted slightly from Bria
Makes 2 large or 3 medium loaves

Ingredients
6 – 7 cups all-purpose flour
6 tsp (2 Tbsp) active dry yeast (not quite 3 packages)
½ C sugar
1 ½ t salt
1 stick unsalted butter, at room temperature
1 1/3 C hot tap water
4 whole eggs (preferably at room temperature), plus 1 egg yolk (save the white! you’ll need it later.)
Splash of milk
Oil for the bowl

  1. Combine 2 cups of flour with the yeast, sugar, and salt stand mixer fitted with the paddle and stir well.
  2. Add softened butter and stir again. It will look like wet sand, not a cohesive mass. 
  3. Add the hot tap water and beat at medium speed for 2 minutes until well mixed and elastic.
  4. Add the eggs & yolk, and 1 ½ cups more flour. Beat at high speed for 1 minute or until thick and elastic.
  5. Switch to the dough hook attachment, and stir in the remaining 2 1/2 – 3 1/2 cups of flour.  (The first time you make this, go for 3 cups.  As you make it more, you’ll have a better idea of your preferences and you’ll know the dough better, and will be better able to gauge how much flour is necessary.) 
  6. Once the flour is incorporated, knead for 5-10 minutes until it is smooth and elastic.  I usually let my mixer to the kneading first, then move it to a floured surface and finish it by hand. You can keep adding flour as you knead, so the dough doesn’t stick to my hands or the counter.  I go by the windowpane test to know when it’s kneaded enough.
  7. Wash and oil the mixing bowl. Place the dough in the bowl, turn it over once to ensure it’s well-coated, and cover with a clean dish towel for 20 minutes. The dough will swell slightly, but do not expect an overtly visible change.
  8. There are lots of ways to shape your loaves – braids are traditional.  I do 6-part braids (it’s easier than it sounds, I promise!), and I use a digital scale and a bench scraper so everything is even.  Start by dividing it into two equal pieces (or three, or however many loaves you want to make). Place one piece on your work surface and set the others aside, keeping them covered with a towel or plastic wrap.  Divide your working dough into however many pieces you need, and roll each piece into a long snake.    Try to get the snakes roughly the same length and thickness.  You don’t need to be all that gentle with it – this dough is meant to be played with!  Press the snakes together at one end and get to braiding!  Here’s a great video for the 6-strand braid, or you can to simpler 3- or 4-strand braids. Whichever you choose, when you’re done braiding, tuck the ends underneath the loaf and move it to a parchment-lined baking sheet.  Repeat with other parts of the dough. 
  9. You can either bake immediately or cover the loaves loosely with plastic wrap and refrigerate for 2-24 hours.  When you are ready to bake, remove the loaves from the refrigerator and let them begin to come to room temperature while you heat the oven to 355 (approximately 10-15 minutes). Beat the egg white in a small dish with splash of milk and gently brush over the loaves. Bake them for 35-40 minutes, slightly less if you went with three loaves as they will be smaller. When they are done, the loaves will be a rich, golden brown and will sound hollow when thumped on the bottom.

      4666971255_176cdbc214_b


      Upgrading Basic Challah to Chocolate-Cinnamon Challah

      Chocolate-Cinnamon Filling

      Ingredients
      1 lb semisweet chocolate, chopped (or chocolate chips or mini chocolate chips*)
      1 Tbsp cinnamon
      1/2 cup sugar
      3/4 stick butter (6 Tbsp), cut into 1-inch pieces

      This is most easily done in the food processor – put the chocolate in first and grind it until it’s finely chopped.  Add in the cinnamon and sugar and combine thoroughly.  Add in the butter and mix well but don’t liquefy it.
      *If you use mini chocolate chips, you can skip the food processor altogether and just mix everything together, adding the butter last.


      Adding the Filling
      1. Make the basic challah dough through step 7, and make the chocolate-cinnamon filling.  Divide the dough as above, making your dough snakes.  Using a rolling pin, flatten one snake at a time.  Make the dough quite thin, and roughly rectangular. Try to keep it roughly the length it was before you started rolling it out.
      2. Sprinkle some chocolate filling evenly over the dough, leaving about a half-inch strip along one long edge. (I just eyeball the amount of filling needed – half of the batch per loaf, divided by the number of strands I’m braiding plus one, so that I have some left to put on the outside of the loaves.)   Press the filling into the dough.
      3. Roll the snake back up like a skinny cinnamon roll, pressing it together after each roll.  Pinch the seam to stick it together.  Set aside and repeat for remaining snakes.
      4. Sprinkle the little bit of remaining filling on your work surface and put your snakes down for braiding.  Braid the dough, pressing the little bits of filling to the outside as you go.  Use up all that filling!  (If you run out of filling for the outside, you can toss some mini chocolate chips in cinnamon and put those on the outside.  I like to have an external indicator of the internal goodness.)
      5. Repeat with remaining dough, and continue with step 9 above.  Slice and enjoy!  It also freezes beautifully.  I haven’t tried making bread pudding with it, but I bet it would be amazing!

      Saturday, April 16, 2011

      Socks! Finished Socks!


      DSC_0732
       
      Hey, lookit that!  I finished a whole pair of socks!  It only took me a year (or more, maybe…) and 2 3 4 start-overs.  Turns out I have really, really loose gauge.  I hadn’t noticed just how loose it was, because I tend to make things that don’t depend on gauge, but my sock attempts kept turning out HUGE.  These were knit on size 2 needles even though the pattern calls for size 5.  Yeah.  But once I figured that out and decided to, y’know, actually swatch for socks, it was smooth sailing.

      And I cast on my second pair (a different pattern) approximately 8 hours after finishing this pair, so it seems I’ve caught the sock-knitting bug (cue groans from my husband as he anticipates more money being spent on yarn)...
       

      Speaking of yarn – this is lovely stuff.  It’s Rios by Malabrigo, a Superwash Merino, roughly worsted weight.  I love the colorway, and it’s a dream to knit up.  Highly recommended!


      Monday, March 28, 2011

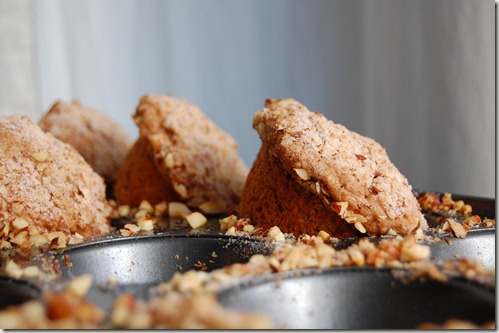
      Hazelnut Muffins, with Teff Flour

      DSC_0342


      These muffins are from Kim Boyce’s much-heralded Good to the Grain, and they are lovely.  I’d never used teff flour before, but I’ll definitely continue to use it!  It has sort of a delicate grassy flavor that is faintly sweet.  It’s wonderful in these muffins!

      The only thing I’d like to change about these muffins is the body-to-topping ratio.  There was too much topping for the 12 muffins I got (you can see how much of it fell off – and the recipe was only supposed to yield 10 muffins!) and at the same time, there wasn’t enough of it for each bite of muffin.  I think next time I’ll fold half of the topping into the batter and see how that works out.


      DSC_0334

      Hazelnut Muffins
      from Good to the Grain

      1 stick unsalted butter
      1/2 cup raw hazelnuts, skins on, chopped into rough halves
      1/2 tsp kosher salt

      For topping:
      1/2 cup raw hazelnuts, skins on, finely chopped
      1/4 cup sugar
      1 tsp freshly grated nutmeg
      1/2 tsp cinnamon

      For muffins:
      Dry mix:
      1 cup whole wheat flour
      3/4 cup teff flour
      1/2 cup all-purpose flour
      1/2 cup sugar
      1 Tbsp baking powder
      1/2 tsp baking soda
      1 tsp kosher salt

      Wet mix:
      1 cup buttermilk
      1/2 cup plain yogurt
      2 eggs
      1 tsp vanilla extract

      Preheat oven to 350°.  Grease muffin tins with butter or cooking spray.

      Place the butter, hazelnuts, and salt in a small heavy-bottomed pan and cook over medium heat, swirling the pan occasionally and watching for the edges of the nuts to turn golden brown.  Remove the pan from the flame before the nuts get too brown, as they will continue to cook in the hot butter.  Pour them into a bowl to cool down.

      In a small bowl, stir together the topping ingredients. Set aside.

      Sift the dry ingredients into a large bowl.  In a medium bowl, whisk the wet ingredients until thoroughly combined. (This is where I'd fold in about half of the topping, after combining the other ingredients.)

      Pour the hazelnuts and their butter over the dry ingredients, and then pour the buttermilk mixture over the top of that.  Using a spatula, mix together the wet and dry ingredients.

      Scoop the batter into 10-12 muffin cups.  The batter should be mounded above the edges of the cups.  Sprinkle the topping evenly over the batter, gently pressing it into the batter so it adheres.

      Bake for 22-26 minutes, rotating the pan halfway through.  Let cool on a rack in the pan until they’re cool enough to handle. Remove each muffin from its cup and set it on its side in the cup to cool (this will keep them from getting soggy).

        © Free Blogger Templates Spain by Ourblogtemplates.com 2008

      Back to TOP